Creating a Custom Formatter
The third component of a field is the formatter. Thus far we have introduced how to create a field class and a widget class for a field. The field class is responsible for describing the field, loading data into it, and providing search support. The widget class provided a Drupal form for online editing of the field. Finally, the formatter is responsible for display of the field on a Tripal site.
Note
This guide assumes you already have your formatter class file created. For more information, see Manual Field Creation or, Easier Field Creation: Tripal Field Generator.
The formatter class is the simplest of all the Tripal field classes. Here we will again use the obi__organism field that comes with the tripal_chado module.
The view() function.
In most cases the only function you need to implement is the view() function. This function is called whenever your field needs to be displayed on a page. The following code is from the obi__organism_formatter.inc class file.
1 2 3 4 5 6 7 8 9 10 11 12 13 14 15 16 17 | public function view(&$element, $entity_type, $entity, $langcode, $items, $display) {
if ($items[0]['value']) {
$content = $items[0]['value']['rdfs:label'];
if (array_key_exists('entity', $items[0]['value'])) {
list($entity_type, $entity_id) = explode(':', $items[0]['value']['entity']);
$content = l(strip_tags($items[0]['value']['rdfs:label']), 'bio_data/' . $entity_id);
}
// The cardinality of this field is 1 so we don't have to
// iterate through the items array, as there will never be more than 1.
$element[0] = array(
'#type' => 'markup',
'#markup' => $content,
);
}
}
|
- In the code above the input arguments have the following meaning:
$elementis the first argument. It is an array into which you should set the contents to be displayed.$entity_typewill always have the valueTripal Entity.$entityis the entity object which contains all information about the entity including the loaded data values.$langcodeis the language. This is used by Drupal to provide translations of data into other spoken languages. By default, Tripal does not use a language, as biological data is generally language agnostic. Consider for example a gene sequence or a feature coordinate.$itemsis an array containing all of the loaded data for this field.$displayis the name of the display such as full page, a teaser, etc. Currently, Tripal does not distinguish between displays.
The purpose of the view() function is to iterate through the values in the $items array, and format them into an appropriate display for viewing. Here you must remember the structure of the data in the $items array.
To demonstrate this function, let’s look at what we expect in our $items array. Using the Citrus sinesis organism from the User’s Guide. We would expect an items array to look like the following:
$items = [
  0 => [
    "value" => [
      "rdfs:label" =>  "Citrus sinensis",
      "rdfs:type" =>  "Organism",
      "local:abbreviation" =>  "C. sinensis",
      "TAXRANK:0000005" => "Citrus",
      "TAXRANK:0000006" => "sinensis",
      "entity" => "TripalEntity:3",
    ],
    "chado-feature__organism_id" => 12,
  ],
];
You may recall that the $items array structure is the same as that created by the load() function described in the Manual Field Creation page. Note that each key in the value array is an accession for a controlled vocabulary term. These accessions are used to unambiguously describe the value. To display the organism on a page we need the element named rdfs:label. Thus, we set the $content variable to contain this value as shown on line 4 of the view() function above.
Because our organisms are also published entities we want to link to their respective pages each time an organism is displayed. Because the value array has an element named entity we know that this item is published. Lines 5-6 of the view() function shown above use this information to create a clickable link to the organism page. Finally, the $element argument is set to provide content of type markup. This $element array is a Drupal renderable array.
Lastly, notice the element named chado-feature__organism_id. This element is at the same level as the value element. This data is meant to be used internally by the field. It maps this fields values to the appropriate table in Chado where the data is stored.
Warning
You should never show the user any data that is outside of value element. Remember that your field can be shown by other viewers, including web services. By ensuring that data in the value element is mean to be displayed we ensure that information on the web page, web services, or any other future form of display is always consistent.
In summary, the following should be observed when processing the $items array for viewing:
- A field with only one value (a cardinality of 1) will always have only one element in the
$itemsarray and can use the index 0. This is what has been done in this example code.- A field with more than one value can have any number of elements in the
$itemsarray. You should therefore iterate through all of them.- For every index in
$itemyou should create a matching index in$elementto display the data found in that$item.- If there are no items, then nothing you return will be displayed.
- For each element in the
$itemsarray there is avaluekey. Only the data in thevaluekey should be shown to the user.- Each element in the
$itemsarray may have more than avaluekey. These values are meant to help manage the data.
Warning
You should never have SQL statements or any API calls that retrieve data in the formatter view() function. The formatter should strictly format data for viewing.
Creating Pagers
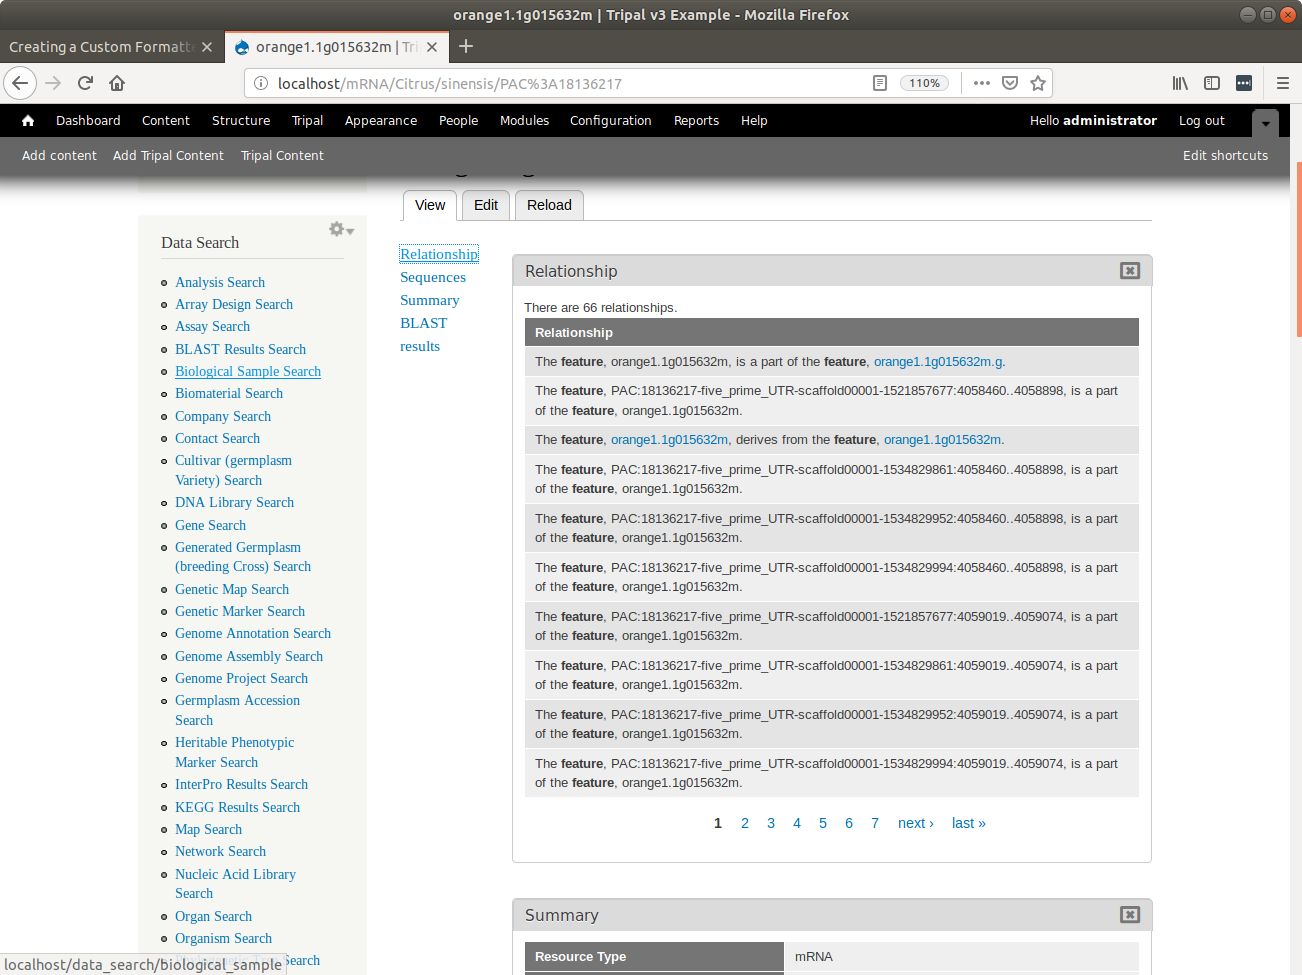
The example shown in the previous section was for a field that will always only contain a single element. However some fields may contain a large number of elements. Consider an mRNA and it’s relationships to subfeatures: exons, 5’ UTRs, 3’UTRs, CDS, etc.). A large mRNA can have many relationships. Alternatively, consider the case where a genetic map content type may have a field that lists all of the markers on the map. Such a list could become extremely long on the page. In these cases it may be best to only list a few items at a time and to provide a pager to let the user cycle through the items. An example of a pager added to the bottom of relationships is shown in the example below.
To create a pager we first need to calculate the number of items we want to display per page and the total number of pages required to display all of the data.
$items_per_page = 10;
$total_records = count($items);
$total_pages = (int) ($total_records / $items_per_page) + 1;
Next, we must initialize the pager by calling the pager_default_initialize function. We pass it the total number of records, the number of items per page and the index (i.e. $pelement) for this pager on the page.
$pelement = 0;
$current_page = pager_default_initialize($total_records, $items_per_page, $pelement);
The call to pager_default_initialize will return the current page. The current page is a numeric number indicating which page the pager is currently showing. The first time the page is loaded this will always be the first page. Each time the user navigates to other pages by clicking the “next” link or the numeric links then this view() function is called and the current page is set to the page being viewed. Next, we must theme the pager so that it follows the look-and-feel prescribed for the site. For this we use the Drupal theme() function.
$pager = theme('pager', array(
  'tags' => array(),
  'element' => $pelement,
  'parameters' => array(),
  'quantity' => $total_pages,
));
By default, all links in the pager cause the page to reload. We do not want the page to reload, rather we only want to update the contents of the field. The TripalFieldFormatter class provides a function named ajaxifyPager to convert a pager into an AJAX pager:
$pager = $this->ajaxifyPager($pager, $entity);
Now that we have a pager, it has been setup for AJAX and we know the current page that the user is viewing we can now display only the items from the $items array that are appropriate for the page being viewed. A common way to provide multiple items on a page is within a table. When we set the $element array we need to be sure to provide both the content and the pager:
$element[0] = array(
  '#type' => 'markup',
  '#markup' => $content . $pager,
);
The settingsForm() Function.
Sometimes you may want to provide some control to the site developer for the formatter. For example, the sbo__relationship_formatter allows the site developer to customize the title that appears above the table that houses relationships and the text the appears if there are no relationships. By default the title is “Relationships” and the empty text indicates there are no relationships. Both are a bit too generic. The settingsForm() function allows you to provide a Drupal form for the field that appears on the Administer > Structure > Tripal Content Types on any content type’s manage display page:
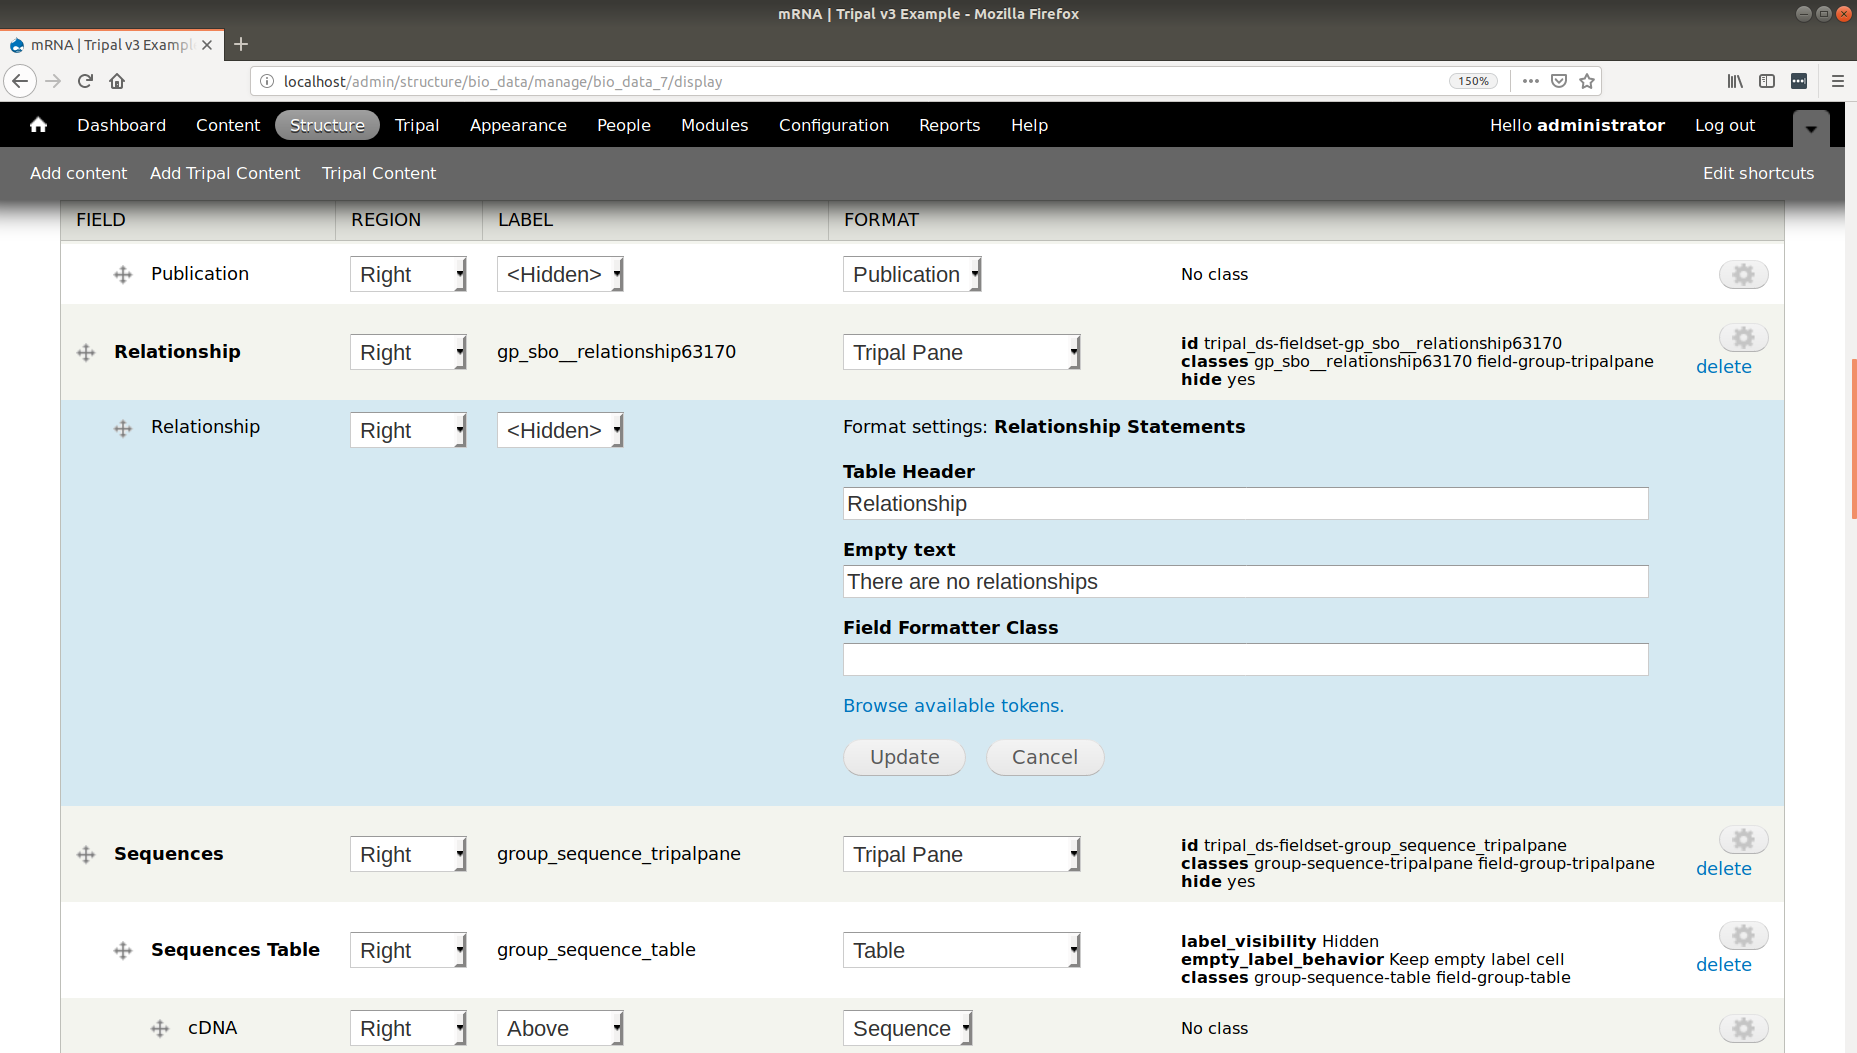
The form shown in the screenshot above is provided by the settingsForm() function. The following code generates this form:
1 2 3 4 5 6 7 8 9 10 11 12 13 14 15 16 17 18 | public function settingsForm($view_mode, $form, &$form_state) {
$display = $this->instance['display'][$view_mode];
$settings = $display['settings'];
$element = array();
$element['title'] = array(
'#type' => 'textfield',
'#title' => 'Table Header',
'#default_value' => array_key_exists('title', $settings) ? $settings['title'] : 'Relationship',
);
$element['empty'] = array(
'#type' => 'textfield',
'#title' => 'Empty text',
'#default_value' => array_key_exists('empty', $settings) ? $settings['empty'] : 'There are no relationships',
);
return $element;
}
|
The form is typical of any form. Note, however that the #default_value is set using the current settings values.
A settings form is useful but it only works when Drupal knows what settings you want for your field. You must provide the settings names (e.g. “title” and “empty” in this case) when you attach your field to a given content type (i.e. bundle). You tell Drupal to attach this field to a content type using the hook_bundle_instances_info function. See
the Attach Fields to Content Types to learn more about this function. Briefly, the display section of the info array for the sbo__relationship field contains the following settings for the display:
'display' => array(
  'default' => array(
    'label' => 'hidden',
    'type' => 'sbo__relationship_formatter',
    'settings' => array(
      'title' => 'Relationships',
      'empty' => 'There are no relationships'
    ),
  ),
),
Warning
In order for the settingsForm() implemented to be available on the “Manage Display” page, you must also implement settingsSummary() as described below.
The settingsSummary() Function.
The settingsSummary() function provides a summary of the current settings values for a field on the manage display page. The following shows the same relationship field from the previous section, but with the settings form closed, and a summary of the current values shown:
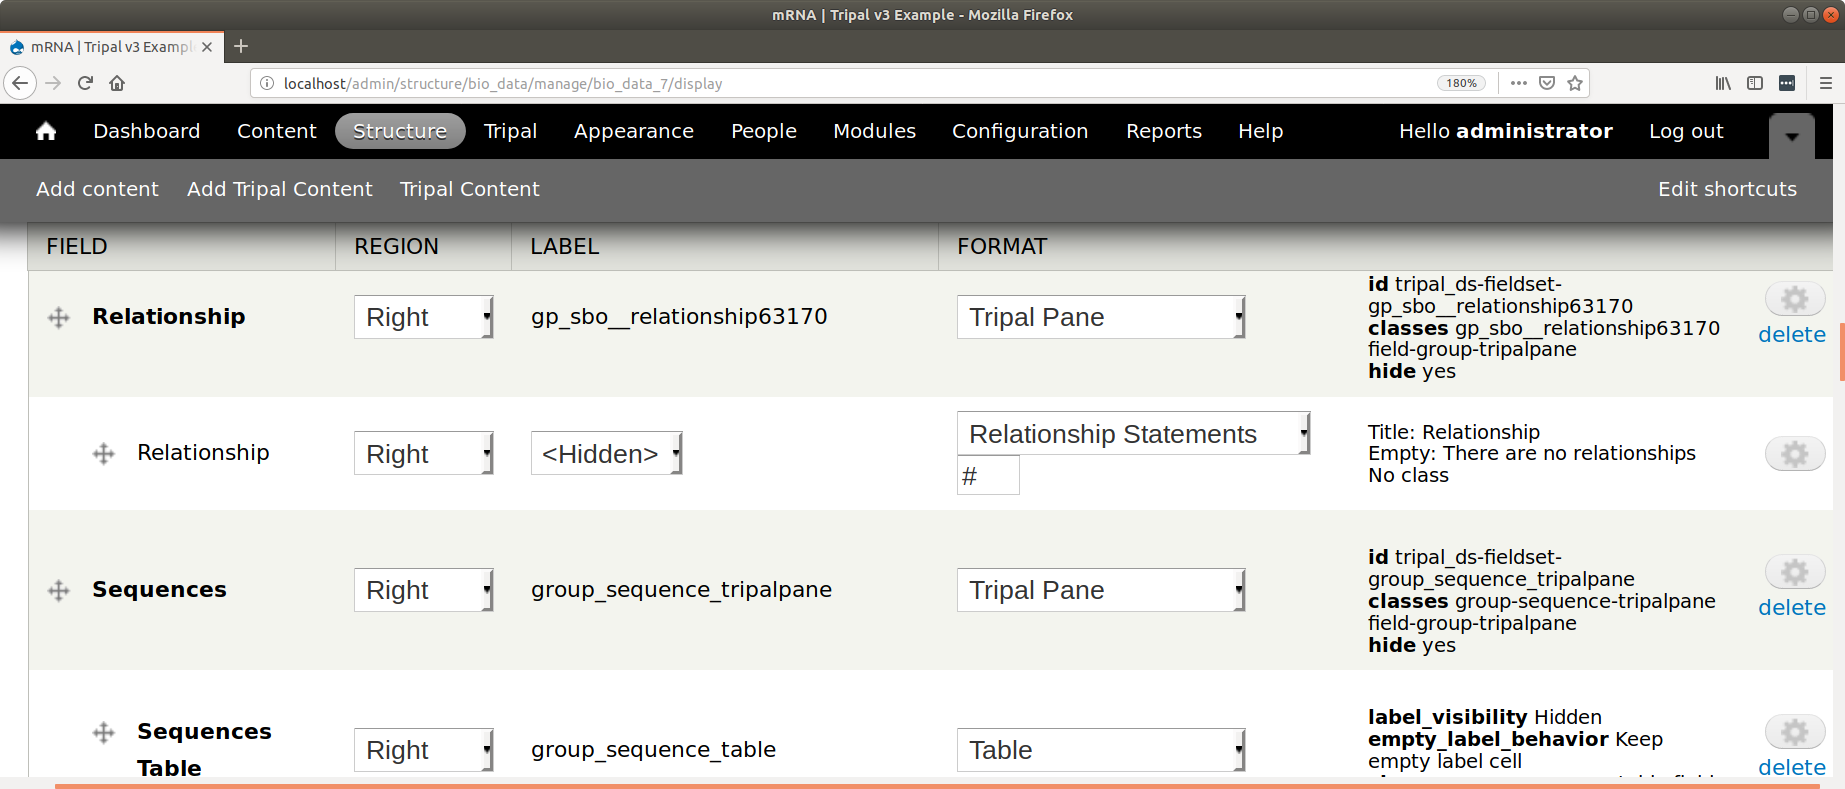
An example of the settingsSummary() function that generates the summary in the image above is as follows:
1 2 3 4 5 6 7 8 9 10 11 12 | public function settingsSummary($view_mode) {
$display = $this->instance['display'][$view_mode];
$settings = $display['settings'];
$summary = t('Title: @title<br>Empty: @empty',
array(
'@title' => $settings['title'],
'@empty' => $settings['empty'])
);
return $summary;
}
|