Creating Custom Data Loaders
Note
This guide is also available as a video on youtube.
The TripalImporter class can be extended to create your own data loader. This class provides many conveniences to simplify loader construction. For example, it simplifies and unifies input form development, automatically handles files upload by the user, provides job submission, logging and progress updates. Using the TripalImporter to create your loader also makes it easy to share your loader with other Tripal users!
To document how to create a new importer, we will describe use of the TripalImporter class within the context of a new simple importer called the ExampleImporter. This importer will read in a comma-separated file containing genomic features and their properties ( a fictional “Test Format” file). The loader will split each line into feature and property values, and then insert each property into the featureprop table of Chado using a controlled vocabulary term (supplied by the user) as the type_id for the property.
Note
Prior to starting your data loader you should plan how the data will be imported into Chado. Chado is a flexible database schema and it may be challenging at times to decide in to which tables data should be placed. It is recommended to reach out to the Chado community to solicit advice. Doing so will allow you to share your loader will other Tripal users more easily!
Create a Custom Module
To create your own importer, you first need to have a custom extension module in which the loader will be provided. If you do not know how to create a module, see the section titled Creating a Custom Module for further direction. Providing your new importer within a custom module will allow you to more easily share your loader with other Tripal users. Any site that downloads and enables your extension module will be able to use your data loader. For this document we will describe creation of a new importer in a module named tripal_example_importer.
Create the Class File
To define a new class that extends TripalImporter, you should create a new class file with a .inc extension within your custom module in the directory: includes/TripalImporter/. If this is your first importer, then you will need to create this directory. For the example described here, we will create a new TripalImporter class named ExampleImporter. Therefore, we must name the file the same as the class (with the .inc extension) and place the file here: tripal_example_importer/includes/TripalImporter/ExampleImporter.inc. Initially, our new class is empty:
class ExampleImporter extends TripalImporter {
}
There is no need to include the importer via a require_once statement in your module file. Placing it in the /includes/TripalImporter/ directory of your module is all you need for Tripal to find it. Tripal will automatically place a link for your importer at admin -> Tripal -> Data Loaders.
Note
If after creation of your importer file, Tripal does not show a link for it in the Data Loaders page, check that you have named your class file correctly and it is in the path described above. Sometimes a clear cache is necessary (drush cc all).
Static Variables
The next step in creation of your importer is setting the static member variables. Open the TripalImporter class file that comes with Tripal and found here tripal/includes/TripalImporter.inc. Copy the public static member variables at the top of the class into your own class. For your importer, override any of the public static variables that need to be different from the default.
Note
For the sake of simplicity in this document, many of the default settings are not changed, and therefore, not all are included.
Our ExampleImporter class now appears as follows:
/**
 * @see TripalImporter
 */
 class ExampleImporter extends TripalImporter {

  /**
   * The name of this loader.  This name will be presented to the site
   * user.
   */
  public static $name = 'Example TST File Importer';

  /**
   * The machine name for this loader. This name will be used to construct
   * the URL for the loader.
   */
  public static $machine_name = 'tripal_tst_loader';

  /**
   * A brief description for this loader.  This description will be
   * presented to the site user.
   */
  public static $description = 'Loads TST files';

  /**
   * An array containing the extensions of allowed file types.
   */
  public static $file_types = ['txt', 'tst', 'csv'];

  /**
   * Provides information to the user about the file upload.  Typically this
   * may include a description of the file types allowed.
   */
  public static $upload_description = 'TST is a fictional format.  Its a 2-column, CSV file.  The columns should be of the form featurename, and text';

  /**
   * Indicates the methods that the file uploader will support.
   */
  public static $methods = [
    // Allow the user to upload a file to the server.
    'file_upload' => TRUE,
    // Allow the user to provide the path on the Tripal server for the file.
    'file_local' => TRUE,
    // Allow the user to provide a remote URL for the file.
    'file_remote' => TRUE,
  ];
}
Warning
The variables that are private static should not be copied and should not be changed. Only copy and change the public static member variables.
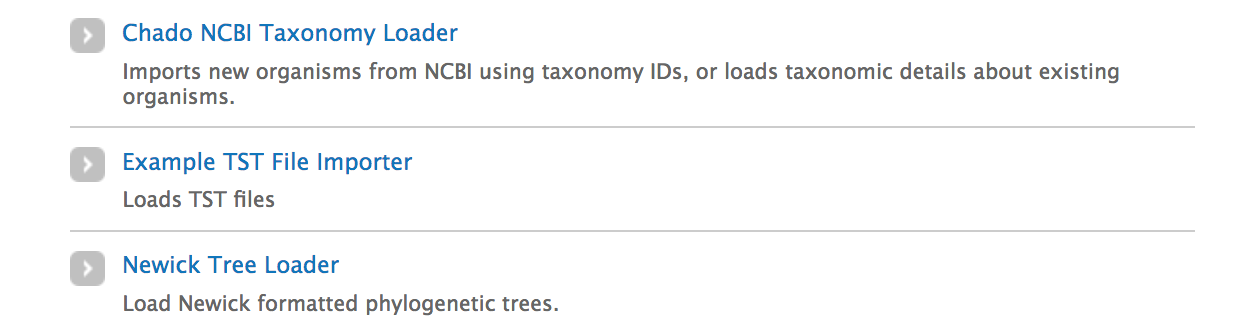
Now that we’ve given our importer a name and description, it will show up at /admin/tripal/loaders:
Form Components
By default, the TripalImporter class will provide the necessary upload widgets to allow a user to upload files for import. The static variables we set in the previous step dictate how that uploader appears to the user. However, for this example, our importer needs additional information from the user before data can be loaded. We need to provide additional form widgets.
Typically, to create forms, Drupal provides form hooks: form, form_validate, form_submit. The TripalImporter wraps these for us as class functions named form, formValidate and formSubmit. We can override these class functions to provide additional widgets to the form.
Note
Typically we only need to implement the form and formValidate functions. The formSubmit does not need to be modified.
Note
If you are not familiar with form creation in Drupal you may want to find a Drupal reference book that provides step-by-step instructions. Additionally, you can explore the API documentation for form construction for Drupal 7. Here, this example expects you are comfortable with form construction in Drupal.
The form function
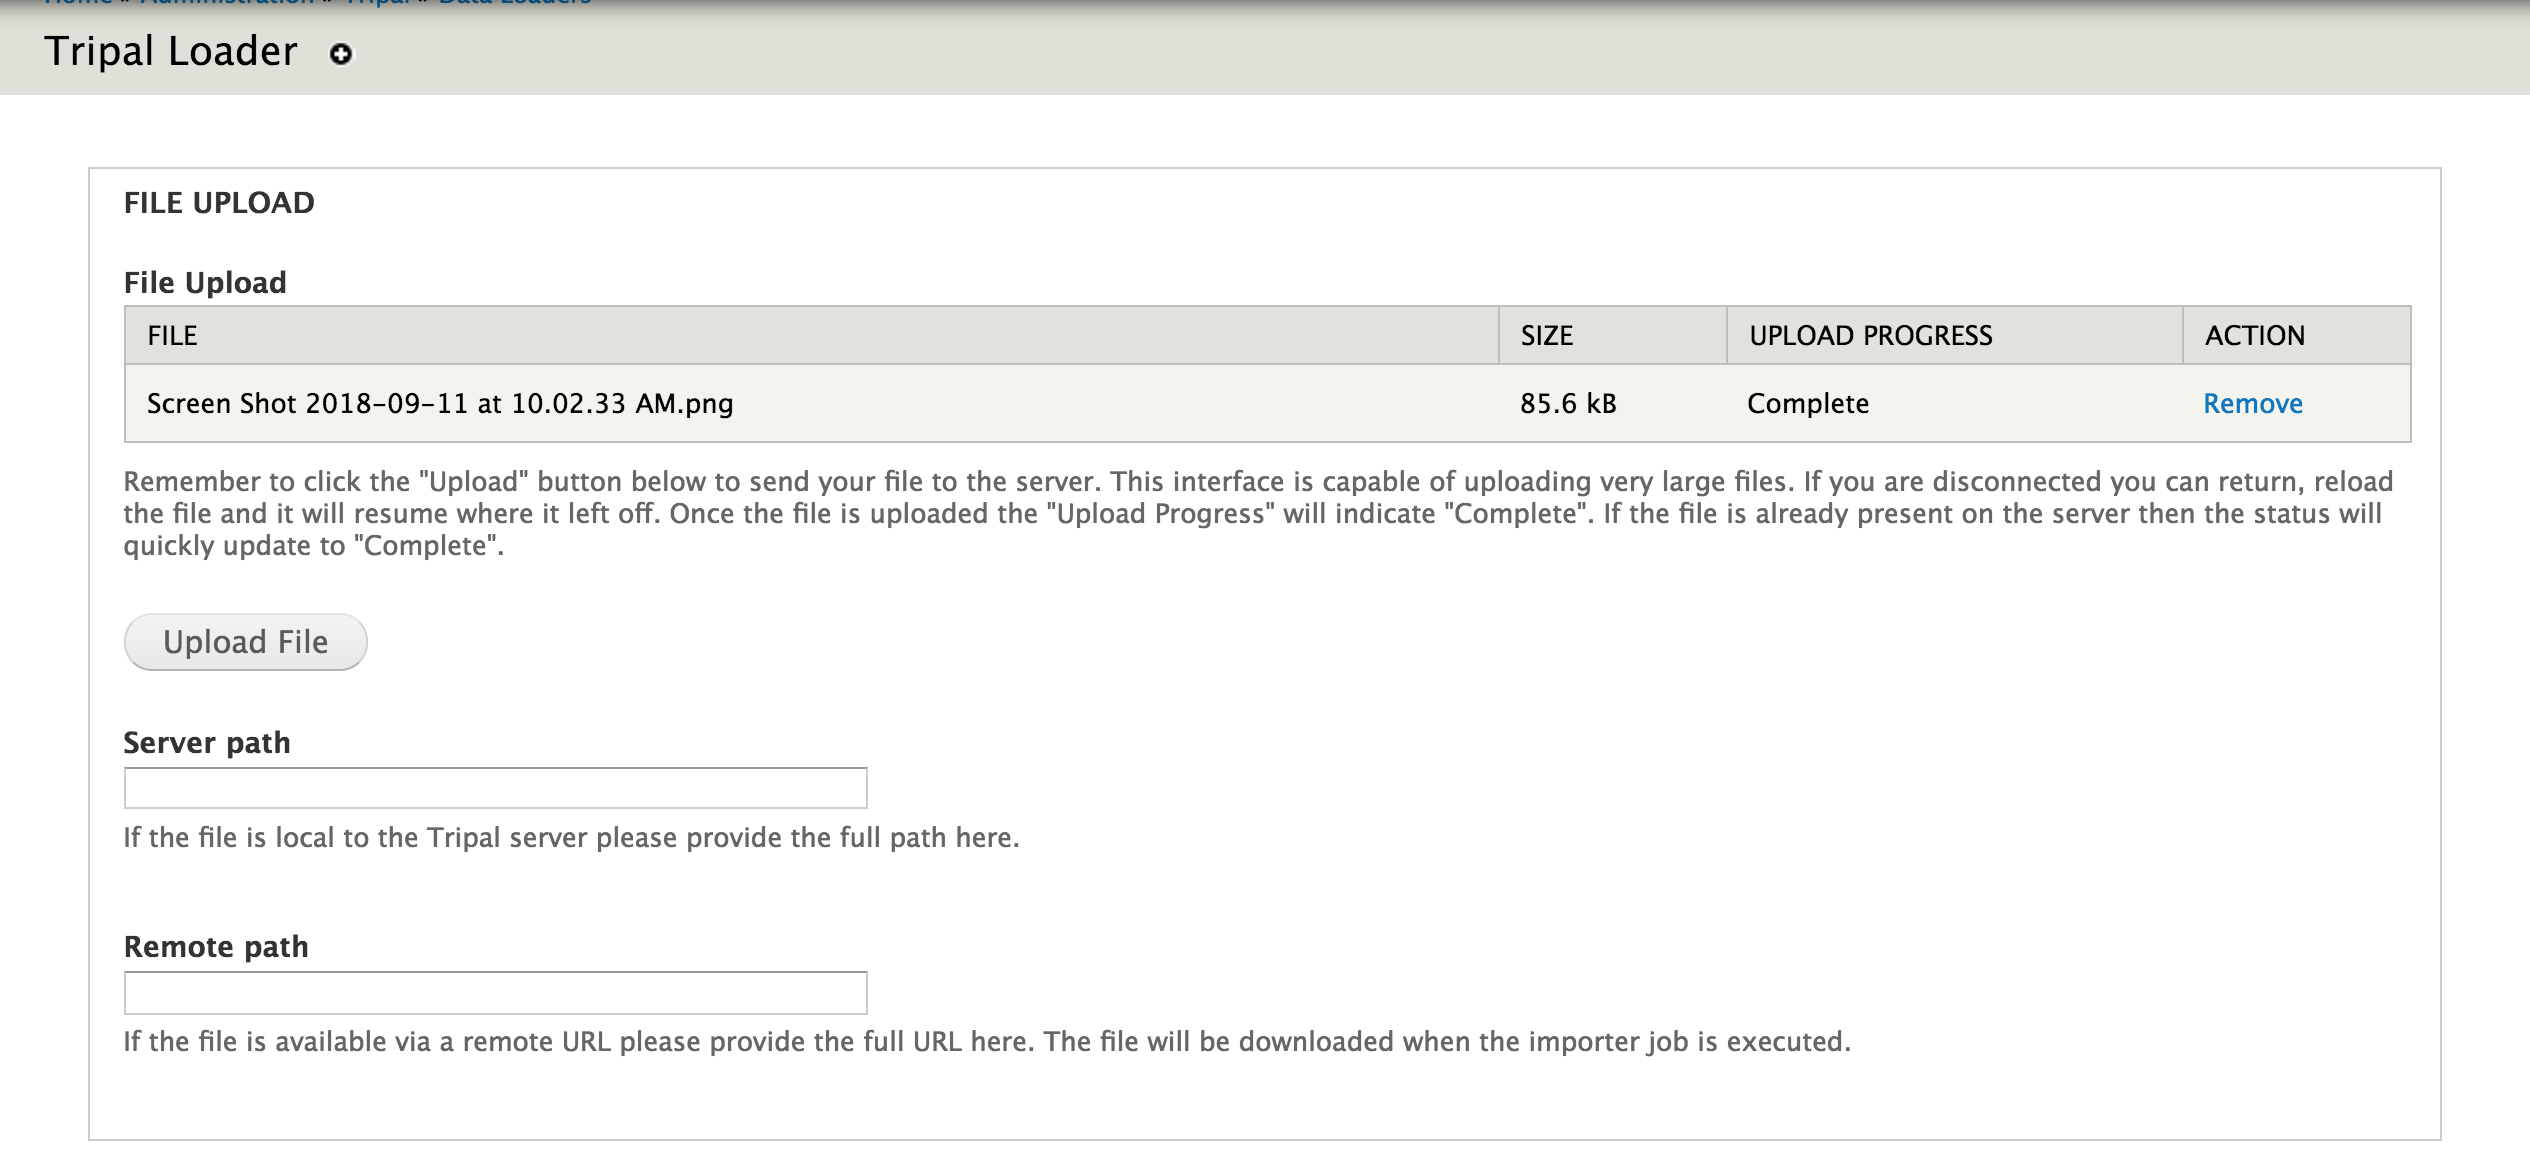
To provide custom widgets for our importer we need to implement the form function. However, let’s review the current form provided by the TripalImporter for us already. Using the static variables settings specified above the form automatically provides a File Upload field set, and an Analysis selector. The File Upload area lets users choose to upload a file, provide a Server path to a file already on the web server or a Remote path for files located via a downloadable link on the web. The Analysis selector is important because it allows the user to specify an analysis that describes how the data file was created.

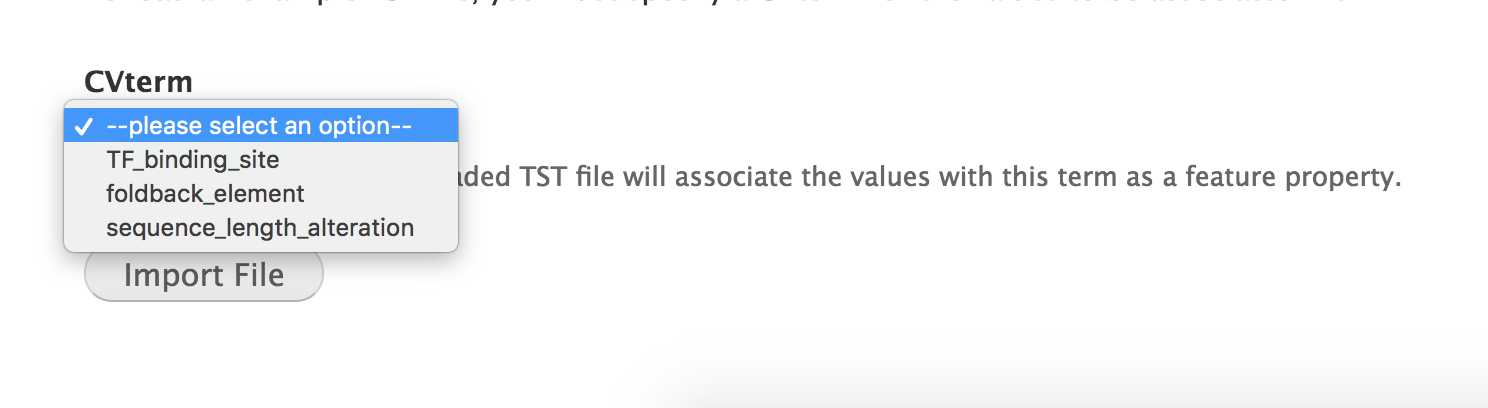
For our example TST file importer these upload options are sufficient. However, for our data import we want the user provide a CV term. We want our importer to read the file, split it into feature and values, and insert properties into the featureprop table of Chado using the the CV term as the type_id for the table.
To add a widget that allows the user to provide a CV term, we must implement the form function and include code using Drupal’s Form API that will add the widget.
public function form($form, &$form_state) {


  // For our example loader let's assume that there is a small list of
  // vocabulary terms that are appropriate as properties for the genomics
  // features. Therefore, we will provide an array of sequence ontology terms
  // the user can select from.
  $terms = [
    ['id' => 'SO:0000235'],
    ['id' => 'SO:0000238'],
    ['id' => 'SO:0000248']
  ];

  // Construct the options for the select drop down.
  $options = [];
  // Iterate through the terms array and get the term id and name using
  // appropriate Tripal API functions.
  foreach ($terms as $term){
    $term_object = chado_get_cvterm($term);
    $id = $term_object->cvterm_id;
    $options[$id] = $term_object->name;
  }

  // Provide the Drupal Form API array for a select box.
  $form['pick_cvterm'] =  [
    '#title' => 'CVterm',
    '#description' => 'Please pick a CVterm.  The loaded TST file will associate the values with this term as a feature property.',
    '#type' => 'select',
    '#default_value' => '0',
    '#options' => $options,
    '#empty_option' => '--please select an option--'
  ];

  // The form function must always return our form array.
  return $form;
}
Our form now has a select box!
Using AJAX in forms
Note
This section is not yet available. For now, check out the Drupal AJAX guide https://api.drupal.org/api/drupal/includes%21ajax.inc/group/ajax/7.x
The formValidate function
The formValidate function is responsible for verifying that the user supplied values from the form submission are valid. To warn the user of inappropriate values, the Drupal API function, form_set_error() is used. It provides an error message, highlights in red the widget containing the bad value, and prevents the form from being submitted–allowing the user to make corrections. In our example code, we will check that the user selected a CV term from the pick_cvterm widget.
public function formValidate($form, &$form_state) {

  // Always call the TripalImporter (i.e. parent) formValidate as it provides
  // some important feature needed to make the form work properly.
  parent::formValidate($form, $form_state);

  // Get the chosen CV term form the form state and if there is no value
  // set warn the user.
  $chosen_cvterm = $form_state['values']['pick_cvterm'];
  if ($chosen_cvterm == 0) {
    form_set_error('pick_cvterm', 'Please choose a CVterm.');
  }
}
The implementation above looks for the pick_cvterm element of the $form_state and ensures the user selected something. This is a simple example. An implementation for a more complex loader with a variety of widgets will require more validation checks.
Note
If our importer followed best practices, it would not need a validator at all. The cvterm select box in the form could be defined as below. Note the '#required' => True line: this would handle the validation for us. For this tutorial, however, we implement the validation ourselves to demonstrate the function.
// Provide the Drupal Form API array for a select box.
$form['pick_cvterm'] =  [
  '#title' => 'CVterm',
  '#description' => 'Please pick a CVterm.  The loaded TST file will associate the values with this term as a feature property.',
  '#type' => 'select',
  '#default_value' => '0',
  '#options' => $options,
  '#empty_option' => '--please select an option--'
  '#required' => True
];
When an importer form is submitted and passes all validation checks, a job is automatically added to the Tripal Job system. The TripalImporter parent class does this for us! The Tripal Job system is meant to allow long-running jobs to execute behind-the-scenes on a regular time schedule. As jobs are added they are executed in order. Therefore, if a user submits a job using the importer’s form then the Tripal Job system will automatically run the job the next time it is scheduled to run or it can be launched manually by the site administrator.
Importer Execution
The form and formValidate functions allow our Importer to receive an input file and additional values needed for import of the data. To execute loading a file the TripalImporter provides several additional overridable functions: run, preRun and postRun. When the importer is executed, the preRun function is called first. It allows the importer to perform setup prior to full execution. The run function is where the full execution occurs and the postRun function is used to perform “cleanup” prior to completion. For our ExampleImporter class we only need to implement the run function. We have no need to perform any setup or cleanup outside of the typical run.
The run function
The run function is called automatically when Tripal runs the importer. For our ExampleImporter, the run function should collect the values provided by the user, read and parse the input file and load the data into Chado. The first step, is to retrieve the user provided values and file details. The inline comments in the code below provide instructions for retrieving these details.
/**
 * @see TripalImporter::run()
 */
public function run() {

  // All values provided by the user in the Importer's form widgets are
  // made available to us here by the Class' arguments member variable.
  $arguments = $this->arguments['run_args'];

  // The path to the uploaded file is always made available using the
  // 'files' argument. The importer can support multiple files, therefore
  // this is an array of files, where each has a 'file_path' key specifying
  // where the file is located on the server.
  $file_path = $this->arguments['files'][0]['file_path'];

  // The analysis that the data being imported is associated with is always
  // provided as an argument.
  $analysis_id = $arguments['analysis_id'];

  // Any of the widgets on our form are also available as an argument.
  $cvterm_id = $arguments['pick_cvterm'];

  // Now that we have our file path, analysis_id and CV term we can load
  // the file.  We'll do so by creating a new function in our class
  // called "loadMyFile" and pass these arguments to it.
  $this->loadMyFile($analysis_id, $file_path, $cvterm_id);
}
Note
We do not need to validate in the run function that all of the necessary values in the arguments array are valid. Remember, this was done by the formValidate function when the user submitted the form. Therefore, we can trust that all of the necessary values we need for the import are correct. That is of course provided our formValidate function sufficiently checks the user input.
Importing the File
To keep the run function small, we will implement a new function named loadMyFile that will perform parsing and import of the file into Chado. As seen in the code above, the loadMyFile function is called in the run function.
Initially, lets get a feel for how the importer will work. Lets just print out the values provided to our importer:
public function loadMyFile($analysis_id, $file_path, $cvterm){
  var_dump(["this is running!", $analysis_id, $file_path, $cvterm]);
}
To test our importer navigate to admin > Tripal > Data Importers and click the link for our TFT importer. Fill out the form and press submit. If there are no validation errors, we’ll receive notice that our job was submitted and given a command to execute the job manually. For example:
drush trp-run-jobs –username=admin –root=/var/www/html
If we execute our importer we should see the following output:
Calling: tripal_run_importer(146)

Running 'Example TST File Importer' importer
NOTE: Loading of file is performed using a database transaction.
If it fails or is terminated prematurely then all insertions and
updates are rolled back and will not be found in the database

array(4) {
  [0]=>
  string(16) "This is running!"
  [1]=>
  string(3) "147"
  [2]=>
  string(3) "695"
  [3]=>
  string(72) "/Users/chet/UTK/tripal/sites/default/files/tripal/users/1/expression.tsv"
}

Done.

Remapping Chado Controlled vocabularies to Tripal Terms...
As you can see, running the job executes our run script, and we have all the variables we need to load the data. All we need to do now is write the code!
To import data into Chado we will use the Tripal API. After splitting each line of the input file into a genomic feature and its property, we will use the chado_select_record to match the feature’s name with a record in the feature table of Chado, and the chado_insert_property to add the property value.
public function loadMyFile($analysis_id, $file_path, $cvterm_id){

  // We want to provide a progress report to the end-user so that they:
  // 1) Recognize that the loader is not hung if running a large file, but is
  //    executing
  // 2) Provides some indication for how long the file will take to load.
  //
  // Here we'll get the size of the file and tell the TripalImporter how
  // many "items" we have to process (in this case bytes of the file).
  $filesize = filesize($file_path);
  $this->setTotalItems($filesize);
  $this->setItemsHandled(0);

  // Loop through each line of file.  We use the fgets function so as not
  // to load the entire file into memory but rather to iterate over each
  // line separately.
  $bytes_read = 0;
  $in_fh = fopen($file_path, "r");
  while ($line = fgets($in_fh)) {

    // Calculate how many bytes we have read from the file and let the
    // importer know how many have been processed so it can provide a
    // progress indicator.
    $bytes_read += drupal_strlen($line);
    $this->setItemsHandled($bytes_read);

    // Remove any trailing white-space from the line.
    $line = trim($line);

    // Split line on a comma into an array.  The feature name appears in the
    // first "column" of data and the property in the second.
    $cols = explode(",", $line);
    $feature_name = $cols[0];
    $this_value = $cols[1];

    // Our file has a header with the name 'Feature name' expected as the
    // title for the first column. If we see this ignore it.
    if ($feature_name == 'Feature name'){
       continue;
    }

    // Using the name of the feature from the file, see if we can find a
    // record in the feature table of Chado that matches.  Note: in reality
    // the feature table of Chado has a unique constraint on the uniquename,
    // organism_id and type_id columns of the feature table.  So, to ensure
    // we find a single record ideally we should include the organism_id and
    // type_id in our filter and that would require more widgets on our form!
    // For simplicity, we will just search on the uniquename and hope we
    // find unique features.
    $match = ['uniquename' => $feature_name];
    $results = chado_select_record('feature', ['feature_id'], $match);

    // The chado_select_record function always returns an array of matches. If
    // we found no matches then this feature doesn't exist and we'll skip
    // this line of the file.  But, log this issue so the user knows about it.
    if (count($results) == 0) {
      $this->logMessage('The feature, !feature, does not exist in the database',
        ['!feature' => $feature_name], TRIPAL_WARNING);
      continue;
    }

    // If we failed to find a unique feature then we should warn the user
    // but keep on going.
    if (count($results) == 0) {
      $this->logMessage('The feature, !feature, exists multiple times. ' .
        'Cannot add a property', ['!feature' => $feature_name], TRIPAL_WARNING);
      continue;
    }

    // If we've made it this far then we have a feature and we can do the
    // insert.
    $feature = $results[0];
    $record = [
      'table' => 'feature',
      'id' => $feature->feature_id
    ];
    $property = [
      'type_id' => $cvterm_id,
      'value' => $this_value,
    ];
    $options = ['update_if_present' => TRUE];
    chado_insert_property($record, $property, $options);
  }
}
Logging and Progress
During execution of our importer it is often useful to inform the user of progress, status and issues encountered. There are several functions to assist with this. These include the logMessage, setTotalItems and setItemsHandled functions. All three of these functions were used in the sample code above of the loadMyFile function. Here, we provide a bit more detail.
The logMessage function
The logMessage function is meant to allow the importer to provide status messages to the user while the importer is running. The function takes three arguments:
- a message string.
- an array of substitution values.
- a message status.
The message string contains the message for the user. You will notice that no variables are included in the string but rather tokens are used as placeholders for variables. This is a security feature provided by Drupal. Consider these lines from the code above:
$this->logMessage('The feature, !feature, does not exist in the database',
  ['!feature' => $feature_name], TRIPAL_WARNING);
Notice that !feature is used in the message string as a placeholder for the feature name. The mapping of !feature to the actually feature name is provided in the array provided as the second argument. The third argument supports several message types including TRIPAL_NOTICE, TRIPAL_WARNING and TRIPAL_ERROR. The message status indicates a severity level for the message. By default if no message type is provided the message is of type TRIPAL_NOTICE.
Any time the logMessage function is used the message is stored in the job log, and a site admin can review these logs by clicking on the job in the admin > Tripal > Tripal Jobs page.
Note
You should avoid using print or print_r statements in a loader to provide messages to the end-user while loading the file. Always use the logMessage function to ensure all messages are sent to the job’s log.
The setTotalItems and setItemsHandled functions
The TripalImporter class is capable of providing progress updates to the end-user while the importer job is running. This is useful as it gives the end-user a sense for how long the job will take. As shown in the sample code above for the loadMyFile function, The first step is to tell the TripalImporter how many items need processing. An item is an arbitrary term indicating some measure of countable “units” that will be processed by our importer.
In the code above we consider a byte as an item, and when all bytes from a file are read we are done loading that file. Therefore the setTotalItems function is used to tell the importer how many bytes we need to process. As we read each line, we count the number of bytes read and provide that number to the setItemsHandled function. The TripalImporter class will automatically calculate progress and print a message to the end-user indicating the percent complete, and some additional details such as the total amount of memory consumed during the loading.
Note
All importers are different and the “item” need not be the number of bytes in the file. However, if you want to provide progress reports you must identify an “item” and the total number of items there are for processing.
Testing Importers
Unit Testing is a critically important component of any software project. You should always strive to write tests for your software. Tripal provides unit testing using the phpunit testing framework. The Tripal Test Suite provides a strategy for adding tests for your new Importer. It will automatically set up and bootstrap Drupal and Tripal for your testing environment, as well as provide database transactions for your tests, and factories to quickly generate data. We will use the Tripal Test Suite to provide unit testing for our ExampleImporter.
Note
Before continuing, please install and configure Tripal Test Suite.
For instructions on how to install, configure, and run Tripal Test Suite, please see the Tripal Test Suite documentation.
Example file
When developing tests, consider including a small example file as this is good practice both to ensure that your loader works as intended, and for new developers to easily see the expected file format. For our ExampleImporter, we’ll include the following sample file and store it in this directory of our module: tests/data/example.txt.
| Feature name | CVterm value |
|---|---|
| test_gene_1 | blue |
| test_gene_2 | red |
Loading the Importer
Testing your loader requires a few setup steps. First, TripalImporters are not explicitly loaded in your module (note that we never use include_once() or require_once in the .module file). Normally Tripal finds the importer automatically, but for unit testing we must include it to our test class explicitly. Second, we must initialize an instance of our importer class. Afterwards we can perform any tests to ensure our loader executed properly. The following function provides an example for setup of the loader for testing:
private function run_loader(){

  // Load our importer into scope.
  module_load_include('inc', 'tripal_example_importer', 'includes/TripalImporter/ExampleImporter');

  // Create an array of arguments we'll use for testing our importer.
  $run_args = [
    'analysis_id' => $some_analysis_id,
    'cvterm' => $some_cvterm_id
  ];
  $file = ['file_local' => __DIR__ . '/../data/exampleFile.txt'];

  // Create a new instance of our importer.
  $importer = new \ExampleImporter();
  $importer->create($run_args, $file);

  // Before we run our loader we must let the TripalImporter prepare the
  // files for us.
  $importer->prepareFiles();
  $importer->run();
}
Note
We highly recommend you make use of database transactions in your tests, especially when running loaders. Simply add use DBTransaction; at the start of your test class. Please see the Tripal Test Suite documentation for more information.